
About Resolving Host Issue
In case you’re confronting the issue of Resolving Host Error In Google Chrome, making the websites load gradually, or DNS server not found at that point, don’t stress as, in this guide, we will discuss several fixes that will resolve the issue.
In case you’re not ready to open a website or the website is loading gradually in Google Chrome at that point on the off chance that you look closely, you will see the “Resolving Host” message in the status bar of the browser. That is the underlying driver of the issue. The more significant part of the users experiences this issue; however, they don’t know its purpose and disregard the message until they can’t open the website. This issue also influences Google Chrome and the various browsers, for example, Firefox, Safari, Edge, and so forth.
Note: This message may fluctuate from browser to browser like in Chrome it shows “Resolving host”, in Firefox it shows “Looking up”, and so on.
Content Summary
Why Resolving Host occur on Chrome?
The main thing you do is enter the URL of the website in the browser’s address bar and hit Enter to open any website. As to open any website, the URL which you enter is first changed over into the IP address with the goal that the PCs can get it. The goal of the URL into an IP address occurs through Domain Name System (DNS).
At the point when you enter any URL, it goes to a staggering progression of DNS, and when the right IP address is found for the entered URL, it is sent back to the browser, and accordingly, the page is displayed. The explanation behind resolving the host issue can be your Internet Service Provider (ISP), as the DNS servers designed by them is setting aside a long effort to discover a planning IP address for the entered URL. Different explanations behind the issues are a change in ISP or change in the DNS settings. Another answer is the put-away DNS cache may likewise cause a deferral in finding the right IP address.
10 Ways to Fix Resolving Host Error in Google Chrome
You can fix Resolving host error in Chrome with utilizing the following several methods :
Method 1: Disable DNS Prediction or Prefetching
Chrome Prefetch option permits website pages to load rapidly. This element works by putting away the IP addresses of the site pages visited or searched by you in the cache memory. Furthermore, presently at whatever point you attempt to see a similar URL. At that point, instead of searching for it once more, the browser will legitimately search for the IP address of the entered URL from the cache memory, improving the loading pace of the website. However, this option can likewise cause the Resolving host issue on Chrome, so you have to disable the prefetch highlight by following the beneath steps:
1. Open Google Chrome.
2. Now click on the three dots icon available at the top right corner and select Settings.
3. Scroll down to the bottom of the window and click on Advanced option.
4. Under the Privacy and security section, toggle OFF the button close to the option “Utilize a prediction administration to load pages all the more rapidly”.
In the wake of finishing the above steps, the Prefetch resources option will be disabled, and now you will have the option to visit the site page prior, indicating Resolving Host error.
Method 2: Use Google DNS Server
Source- www.trishtech.com
Here and there the default DNS server gave by the ISP can cause the error in Chrome or now and again the default DNS isn’t dependable, in such cases, you can easily change DNS servers on Windows 10. It is prescribed to utilize Google Public DNS as they are dependable and can fix any issues identified with DNS on your PC.
Method 3: Clear DNS Cache
1. Open Google Chrome and afterward go to Incognito Mode by pressing Ctrl+Shift+N.
2. Now type the following in the address bar and hit Enter:
chrome://net-internals/#dns
3. Next, click Clear host cache and restart your browser.
Method 4: Flush DNS and Reset TCP/IP
1.Right-click on Windows Button and select “Command Prompt(Admin).”
2. Now type the following command and press Enter after everyone:
ipconfig/release
ipconfig/flushdns
ipconfig/renew
3.Again open elevated Command Prompt and type the following and hit enter after everyone:
ipconfig/flushdns
nbtstat –r
netsh int ip reset
netsh Winsock reset
4. Reboot to apply changes. Flushing DNS appears to Fix Resolving Host Error In Google Chrome.
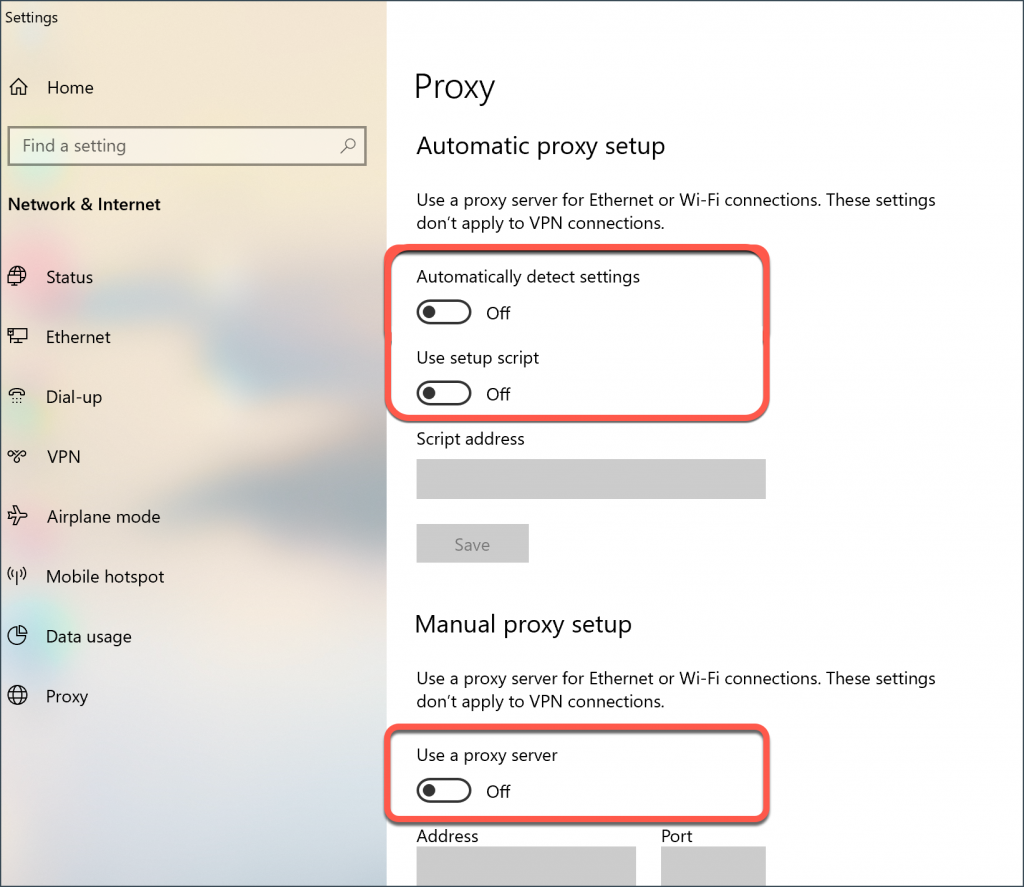
Method 5: Disable VPN and Proxy
Source- www.bitdefender.com
In case you’re utilizing a VPN to unblock the blocked sites in schools, universities, business places, and so forth then it can likewise cause the Resolving Host issue in Chrome. At the point when the VPN is initiated, the client’s real IP address is blocked, and instead, some anonymous IP address is allocated which can make confusion for the system and it can block you from accessing the webpages.
Since the IP address alloted by the VPN can be utilized by countless users which can prompt Resolving Host issue on Chrome. Hence, it is encouraged to briefly disable VPN software and check if you’re ready to access the website.
In the event that you have VPN software introduced on your system or browser, at that point expel you can evacuate them by following the underneath steps:
For the most part, if a VPN is introduced on your browser, its icon will be accessible at the Chrome address bar.
Right-click, the VPN icon at that point, select the “Expel from Chrome” option from the menu.
Additionally, in the event that you have a VPN introduced on your system. At that point from the notification, zone right-click on the VPN software icon.
Click on the Disconnect option.
How to Do it-
In the wake of playing out the above steps, the VPN will either be expelled or incidentally disconnected and now you can attempt to check in case you’re ready to visit the site page which prior was demonstrating the error. On the off chance that you’re despite everything confronting the issue. At that point you additionally need to disable Proxy on Windows 10 by following the underneath steps:
1. Press Windows Key + R then type msconfig and click OK.
2. Select the boot tab and check Safe Boot. At that point, click Apply and OK.
3. Restart your PC and once restarted again press Windows Key + R at that point type inetcpl.cpl.
4. Hit OK to open internet properties, and from that point, select Connections.
5. Uncheck “Utilize a proxy server for your LAN”. At that point, click, OK.
6. Again open MSConfig window and uncheck Safe boot option at that point click apply and OK.
7. Restart your PC, and you might be capable to Fix Resolving Host Error In Google Chrome.
Method 6: Clear Browsing Data

Source- www.howtogeek.com
As you peruse anything utilizing Chrome, it spares the URLs you have searched, download history cookies, different websites, and plugins. The motivation behind doing so is to speed up the search result via searching first in the cache memory or your hard drive and afterward go to the website to download it if not found in the cache memory or the hard drive. Yet, in some cases, this cache memory turns out to be excessively huge. And winds up hindering the page loading giving Resolving Host error in Chrome. In this way, by clearing the browsing data, your concern might be resolved.
To clear the whole browsing history, follow the underneath steps:
1.Open Google Chrome and press Ctrl + H to open history.
2. Next, click Clear browsing data from the left panel.
3. Now you have to choose the period for which you are deleting the history date. On the off chance that you need to erase from the earliest starting point, you have to pick the option to erase browsing history from the earliest starting point.
Note: You can likewise choose several different options, for example, Last hour, Last 24 hours, Last seven days, and so on.
4. Also, checkmark the following:
Browsing history
Cookies and other site data
Cached pictures and records
5. Now click Clear data to begin deleting the browsing history and hang tight for it to finish.
6. Close your browser and restart your PC.
Method 7: Modifying Hosts Profile
A ‘hosts’ file is a plain text file, which maps hostnames to IP addresses. A host file helps in addressing network nodes in a computer network. If the website which you are trying to visit but unable to due to the Resolving Host Error is added in the hosts, file then you to remove the particular website and save the hosts file to fix the issue. Editing the host’s file is not simple, and therefore it is advised that you go through this guide. To modify the host’s file, follow the below step:
1. Press Windows Key + Q then type Notepad and right-click on it to select Run as administrator.
2. Now click File then select Open and browse to the following location:
C:\Windows\System32\drivers\etc
3. Next, from the file type, select All Files.
4. Then select hosts file and click open.
5. Delete everything after the last # sign.
6. Click File>save then close Notepad and restart your PC.
After completing the above steps, your host’s file will be modified and now try to run the website; it may load perfectly now.
More Details
But if you’re still not able to open the website, you can control the domain name’s resolution to the IP address using the host file. And the resolution of the host file takes place before the DNS resolution. So you can easily add the IP address and it’s corresponding domain name or the URL in the host file to fix the Resolving Host error in Chrome. Thus, whenever you visit the particular website, the IP address will get resolved directly from the hosts’ files. As the resolution process will be much faster for the sites, you visit frequently. The only downside of this method is that it is impossible to maintain the IP addresses of all the websites you visit in the host’s file.
1. Type Notepad in Start Menu search bar and then right-click on it and select Run as administrator.
2. Now click File from notepad menu then select Open and browse to the following location:
C:\Windows\System32\drivers\etc
3. Next, from the file type, select All Files, then select hosts file and click open.
4. The host’s file will open, now add the required IP address & its domain name (URL) in the hosts file.
Example: 17.178.96.59 www.apple.com
5. Save the file by pressing the Ctrl + S button on your keyboard.
After completing the above steps, your host’s file will be modified. Now, you can again try to open the website. This time it may load without any issues.
Method 8: Disable IPv6
1. Right click on the WiFi icon on the system tray then click on “Open Network and Internet Settings “.
2. Now scroll down in the Status window and click on Network and Sharing Center.
3. Next, click on your current connection in order to open its Properties window.
Note: If you can’t connect to your network, use Ethernet cable to connect and then follow it.
4. Click on the Properties button in the Wi-Fi Status window.
5. Make sure to uncheck Internet Protocol Version 6 (TCP/IPv6).
6. Click OK then click Close. Reboot your PC to save changes.
Method 9: IP Address Conflict
Source- www.netbeez.com
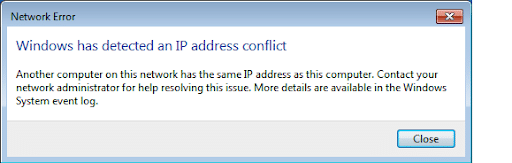
Even though it is not something that occurs frequently. The IP address conflicts are extremely real problems and troubles a lot of users. Conflicting of IP address happens when 2 or more systems connection endpoints or hand-held devices in the same network. As the same IP address allocated to them in the end. These endpoints can be either PCs, mobile devices, or other network entities. When this IP conflict occurs between 2 endpoints, it causes trouble to use the internet or connect to the internet.
If you are facing the error, Windows has detected an IP address conflict on your computer; then this means another device on the same network has the same IP address as your PC. The main issue seems to be the connection between your computer and the router. So try to restart the modem or router and the problem may get resolved.
Method 10: Contact Your Internet Service Provider
If none of the above methods work then the last option is to contact your Internet Service Provider (ISP) and discuss the issue with them. You also need to provide them with all the URLs of the websites that you’re trying to access but unable to because of the Resolving Host Error in Chrome.


